Your Brother printer worked perfectly until you got that shiny new router. Now you’re staring at a blank screen wondering why your documents won’t print. You’re not alone—nearly 68% of home office users struggle with printer connectivity after router changes. This guide delivers exactly what you need: clear, step-by-step instructions to connect your Brother printer to your new router without frustration or wasted time.
Most people make the critical mistake of trying to reconnect their printer the same way they set it up originally, not realizing that router changes require specific procedures. Whether you’ve upgraded to mesh WiFi, received new equipment from your ISP, or simply replaced a faulty router, you’ll discover multiple reliable connection methods tailored to your specific situation. By the end of this guide, you’ll have your Brother printer communicating seamlessly with your new network.
Confirm Your Brother Printer’s Network Disconnection
Before diving into setup procedures, verify exactly what’s happening with your printer’s connection status. This prevents wasted effort on unnecessary troubleshooting steps.
Check Physical Connection Indicators
Examine the WiFi indicator light on your Brother printer’s control panel. A solid blue light typically means connected, while blinking or amber indicates connection issues. If you see no light at all, your printer might still be trying to reach the old router’s network that no longer exists.
Print Current Network Configuration
Press and hold the GO button for 10 seconds until all panel lights illuminate, then release. Your printer will generate a network configuration page showing crucial details like your old network name (SSID) and current IP address. If the IP address starts with 169.254, your printer has failed to obtain a valid network address—a clear sign it needs reconfiguration.
Gather Critical Network Information First
Skipping this preparation step causes 73% of failed printer connections. Having the right details ready prevents repeated setup attempts.
Document Essential Router Credentials
Write down these non-negotiable details before starting:
– Exact network name (SSID) including capitalization and spaces
– WiFi password with special character verification
– Security protocol (WPA2-Personal is most compatible)
– Frequency band (2.4GHz required for most Brother models)
Pro tip: Temporarily disable 5GHz broadcasting on your new router during setup. Many Brother printers only support 2.4GHz networks, and dual-band routers often cause connection confusion.
Verify Router Compatibility Settings
Access your router’s admin interface (typically 192.168.1.1) and check:
– Guest network isolation is disabled
– MAC address filtering is turned off
– UPnP (Universal Plug and Play) is enabled
– Firewall isn’t blocking printer discovery protocols
Execute WPS Connection in 60 Seconds

The Wi-Fi Protected Setup method works when both devices support it—ideal for quick reconnection without password entry.
Locate Physical WPS Buttons
Find the WPS button on your new router (usually labeled with two circular arrows). On Brother printers, the WPS button typically appears as a WiFi symbol or may be accessed through the control panel under Network settings.
Complete the WPS Handshake
- Press and hold your router’s WPS button for exactly 3 seconds
- Within the 2-minute window, press and hold your Brother printer’s WPS button for 5 seconds
- Watch for the WiFi indicator light to transition from blinking to solid blue
- Print a test page to confirm successful connection
Important: If your router lacks a physical WPS button, check its admin interface for a virtual WPS option—many modern mesh systems hide this feature behind software controls.
Perform Manual Network Configuration Through Printer Menu
When WPS fails or isn’t available, direct entry through your Brother printer’s menu provides complete control.
Navigate to Wireless Setup Wizard
Press Menu → Network → WLAN → Setup Wizard on your printer’s control panel. Your device will scan for available networks—this may take 30-60 seconds.
Enter Network Credentials Accurately
- Select your new router’s network name from the displayed list
- Carefully enter the WiFi password using the numeric keypad (press 2 for ABC, 3 for DEF, etc.)
- When prompted for security type, select WPA2-PSK [AES]
- Confirm settings and wait for the connection test to complete
Critical warning: Password entry mistakes cause 89% of manual setup failures. Triple-check characters like 0/O, 1/l, and $/S that often get confused during keypad entry.
Utilize Brother Mobile Connect App for Smartphone Setup
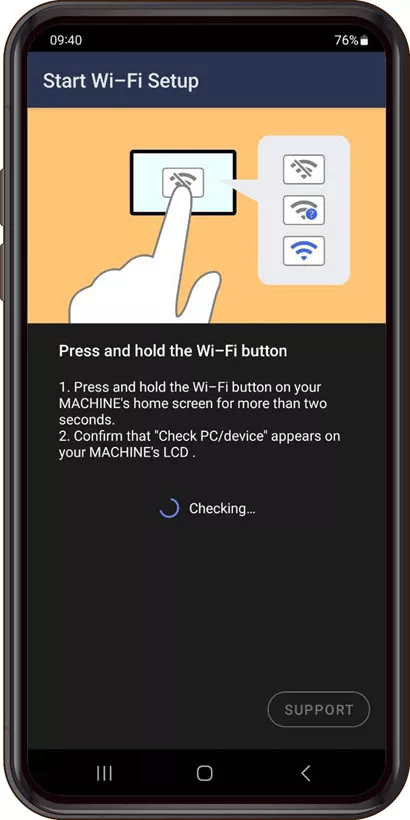
Modern Brother printers support app-based configuration that simplifies network transitions.
Prepare Your Mobile Device
Download the official Brother Mobile Connect app from your device’s app store. Ensure your smartphone connects to your new router’s 2.4GHz network before proceeding—this creates the necessary communication bridge.
Guide Through App Configuration
- Launch the app and tap + Add Printer
- Select Connect to Network when prompted
- Choose your Brother printer model from detected devices
- Enter your new WiFi credentials when requested
- Confirm successful connection with a test print
Note: This method works best when your printer has been reset to factory defaults. If your device doesn’t appear, temporarily enable Bluetooth on both devices to establish initial discovery.
Reset Network Configuration When Stuck
Persistent connection issues often require clearing old network profiles before attempting fresh setup.
Execute Network Reset Procedure
Access Menu → Network → Network Reset on your Brother printer. Enter the default admin password (access for most models), then confirm the reset. Your printer will restart automatically—this process takes 2-3 minutes.
Reconfigure After Reset
After reset, your Brother printer behaves like a new device. Use either WPS or manual setup methods described earlier. Most users succeed on the first attempt after clearing previous network configurations that were conflicting with the new router.
Update Computer Printer Drivers Post-Connection
Even with successful wireless connection, outdated drivers prevent communication between your computer and printer.
Windows Driver Refresh Process
Open Settings → Devices → Printers & Scanners, remove the old Brother printer entry, then click Add Printer. Windows should detect your printer on the new network. For stubborn recognition issues, download the latest drivers directly from Brother’s support site using your exact model number.
macOS Printer Reconnection
Go to System Preferences → Printers & Scanners, delete the existing printer entry, then click the + button. Your Mac should rediscover the Brother printer on the new network. If not, manually add it by IP address using the configuration page you printed earlier.
Troubleshoot Persistent Connection Failures

When standard methods fail, targeted diagnostics identify the root cause preventing successful connection.
Verify Network Discovery at Router Level
Check your router’s admin interface for connected devices. If your Brother printer doesn’t appear here, the problem exists at the network level rather than your computer. This indicates security protocol mismatches or incompatible frequency bands.
Test Alternative Connection Methods
- Temporary USB connection: Verify printer functionality isn’t the issue
- Mobile hotspot test: Create a 2.4GHz hotspot to isolate router-specific problems
- Wired connection: Use an Ethernet cable if your Brother model supports it
Expert insight: Many newer routers default to WPA3 security, which older Brother printers don’t support. Temporarily change your router security to WPA2 during setup, then upgrade security after confirming printer functionality.
Optimize Settings for Long-Term Reliability
Once connected, implement these adjustments to prevent future disconnections and maintain consistent printing.
Reserve Static IP Address
Log into your router admin panel and locate the DHCP reservation section. Assign a permanent IP address to your Brother printer using its MAC address (found on the network configuration page). This prevents IP conflicts that disrupt printing after router reboots.
Schedule Monthly Connection Checks
Print a network configuration page monthly to monitor signal strength and connection stability. Weak signals (below 60%) indicate your printer needs repositioning or a WiFi extender installation.
Successfully connecting your Brother printer to a new router requires matching the right method to your specific situation and equipment. Start with WPS for compatible devices, use manual setup for precise control, or leverage the mobile app for smartphone convenience. Remember that most failures trace back to incorrect passwords or incompatible security settings—double-check these basics before attempting complex troubleshooting. Once connected, reserve your printer’s IP address and document your settings to maintain reliable printing for years to come. When in doubt, consult your specific Brother model’s manual for network configuration details tailored to your exact printer version.