
That expensive hardwood project shouldn’t end up in the scrap pile because of router mistakes. Thousands of DIYers and woodworkers struggle with tear-out, burning, and inconsistent cuts simply because they never learned the proper techniques for their Dewalt router. When you know exactly how to set up and operate this powerful tool, you’ll transform rough lumber into professional-quality furniture with clean edges and precise joinery.
This comprehensive guide delivers the exact setup procedures, safety protocols, and routing techniques that separate amateur attempts from professional results. You’ll discover the specific depth settings for different woods, the critical bit installation steps most beginners skip, and the directional rules that prevent dangerous kickback. Whether you’re trimming cabinet edges or crafting intricate moldings, these actionable steps work for all Dewalt router models from the compact 60V Max to the powerful 2-1/4 HP versions.
Stop wasting expensive materials on avoidable mistakes—master your Dewalt router today with techniques verified by professional woodworkers.
Secure Your Dewalt Router Bit Without Dangerous Wobble
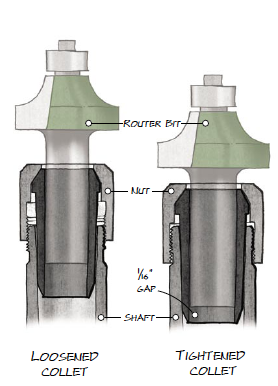
Improper bit installation causes most router accidents and poor-quality cuts. Before plugging in your Dewalt router, completely disconnect power—this non-negotiable safety step prevents accidental starts during setup. Insert the bit shank fully into the collet, then gently pull it back approximately 1/8 inch to allow proper expansion when tightening. This precise positioning prevents bit slippage during operation.
Perfect Collet Tightening Technique for Maximum Safety
Hold the shaft lock button firmly while tightening the collet nut with Dewalt’s included wrenches. Apply steady pressure until snug—over-tightening distorts the collet and actually reduces holding power. Check tightness after your first minute of operation as bits often seat further during initial use. Replace worn collets immediately; they should grip firmly without visible scoring or deformation.
Match Router Bits to Your Specific Project Needs
- Straight bits: Create clean dados, rabbets, and grooves in cabinet construction
- Round-over bits: Soften sharp edges on tabletops and shelves (1/8″ and 1/4″ radii most versatile)
- Flush-trim bits: Perfect for template work and laminate edging (use bearing-guided versions)
- Chamfer bits: Add decorative bevels to tabletop edges and frame corners
- Dovetail bits: Craft strong, interlocking joints for drawers and boxes (14° most common)
Prevent Kickback with Correct Routing Direction
Moving your Dewalt router in the wrong direction causes dangerous kickback that can send the tool flying from your hands. Always move against the bit’s rotation—this pulls the router into the workpiece rather than pushing it away. Visualize the bit as a wheel: when routing outside edges, move counterclockwise around the workpiece; for inside cutouts, move clockwise.
Essential Edge Routing Technique for Clean Cuts
Start with the router base completely flat on your workpiece before turning on the motor. Allow the bit to reach full speed before contacting the wood. Maintain consistent pressure and feed rate—too slow causes burning, too fast creates tear-out. Keep both hands firmly on the handles and lean into the cut with your body weight for maximum control. For long edges, clamp a straightedge guide to ensure perfectly straight cuts every time.
Stop Tear-Out on Delicate Wood Surfaces
Tear-out ruins carefully selected hardwoods and veneers. Prevent this by routing end grain first, then the long grain. Apply painter’s tape along the cut line—this supports wood fibers during the cut. For figured woods like cherry or maple, take multiple light passes (1/16″ depth max) rather than one deep cut. Use a backing board clamped to the workpiece edge to support fragile fibers during the exit point of your cut.
Set Precise Depth for Perfect Dado and Rabbet Joints

Inaccurate depth settings cause loose-fitting joints that compromise project strength. Dewalt’s micro-adjustment systems allow precision within 1/64 inch when properly calibrated. Always test depth settings on scrap material identical to your project wood—different species compress differently under the bit.
Five-Step Depth Adjustment Process
- Set approximate depth using the router’s depth turret while unplugged
- Fine-tune with the micro-adjustment knob while observing the bit’s position
- Lock all depth mechanisms securely before powering on
- Make a test cut on scrap wood matching your project material
- Measure cut depth with calipers and adjust as needed before final cuts
Fix Burning Issues Caused by Incorrect Settings
Burn marks indicate either dull bits or improper technique—not necessarily a router problem. Increase RPM for larger diameter bits (follow Dewalt’s speed chart for specific diameters). Maintain steady forward pressure—hesitating causes burning as the bit lingers in one spot. Apply beeswax to the bit for extremely hard woods like maple or exotic species. Replace bits showing even minor chipping; sharp carbide edges cut cleanly without excessive heat.
Secure Workpieces to Eliminate Dangerous Movement
Routing unstable material causes kickback and inaccurate cuts. Never attempt handheld routing on unsecured workpieces—this ranks among the top three causes of router accidents. Use parallel clamps with protective pads to secure wood to your workbench, or better yet, mount your Dewalt router in a dedicated router table for maximum control.
Essential Safety Gear Checklist Before Starting
- Safety glasses with side shields: Flying wood chips cause 90% of workshop eye injuries
- Hearing protection: Router noise exceeds 100 dB—permanent hearing damage occurs quickly
- Push blocks for small pieces: Maintain safe distance from spinning bits
- Dust collection system: Connect to your router’s dust port to improve visibility and health
- Non-slip work surface: Rubber matting prevents workpiece movement during cuts
Master Plunge Cuts Without Tear-Out
Plunge routing requires specific technique to avoid splintering the wood surface. Set your depth stop before starting, and practice the plunge motion on scrap wood first. Position the router with the front edge slightly overhanging your cut line. Start the motor, then smoothly lower the bit into the wood while moving forward simultaneously—never plunge while stationary.
Perfect Mortise Technique for Strong Joints
Mark mortise boundaries clearly with a marking knife for precision. Use a straight bit slightly narrower than your desired mortise width. Make multiple parallel passes, shifting the router position incrementally until reaching full width. Clean up the ends with a sharp chisel for crisp, square corners. Test fit your tenon frequently—aim for snug but not forced assembly.
Maintain Your Dewalt Router for Decades of Service
Clean your router after every use—dust buildup causes premature motor failure. Use compressed air to remove sawdust from vents, base plate, and depth adjustment mechanisms. Lubricate depth rods monthly with dry Teflon lubricant—not oil, which attracts dust. Check carbon brushes every 50 hours of operation; replace when worn below 1/4 inch.
Bit Storage and Care System That Prevents Damage
Remove bits immediately after use to prevent rust from moisture in sawdust. Clean bits with a brass brush and mineral spirits to remove resin buildup. Store bits vertically in a dedicated case with foam slots—never toss them loosely in a toolbox. Replace collets every 2-3 years under regular use; worn collets cause vibration that ruins cut quality.
Final Proven Tips for Router Mastery
Keep a router journal documenting bit types, speeds, and feed rates that work best for different woods—this saves hours of trial and error on future projects. Always unplug your Dewalt router before changing bits or making adjustments—this simple habit prevents countless accidents. Practice new techniques on scrap wood first; your confidence will grow with each successful cut.
Your Dewalt router delivers professional results when you combine proper setup with correct technique. Focus on mastering one operation completely—like edge profiling or dado cutting—before advancing to complex joinery. With these proven methods, you’ll transform from frustrated beginner to confident woodworker, creating pieces that showcase your growing skills rather than exposing your mistakes. The difference between amateur and professional results lies not in expensive tools, but in understanding exactly how to use the Dewalt router already in your workshop.